- LTX Studio offers two AI image upscaling options — Topaz and Z-Image — both increasing resolution by up to 2x but optimized for different needs.
- Z-Image is faster and more credit-efficient, best for high-volume social and concept work; Topaz delivers higher precision detail recovery, best for final client deliverables and print.
- For maximum efficiency, use Z-Image during concepting and iteration, then re-upscale selected finals with Topaz before delivery.
You generated an image that nails the composition, the subject looks exactly right, and the creative direction is on point. But when you zoom in, the detail isn't there. The resolution is good enough for a thumbnail or a concept board, but not for the final deliverable your client or production team needs.
This is a common friction point in AI image generation workflows. The creative output is strong, but the technical resolution needs a boost before it's production-ready. That's where AI image upscaling comes in, and LTX Studio now gives you two distinct options to handle it: Topaz Upscale and Z-Image Upscale.
Both improve image quality by up to 2x, but they're built for different situations. Choosing the right one depends on what you're producing, how fast you need it, and what your budget looks like. Here's how they compare and when to use each.
What Is AI Image Upscaling?
How AI Upscaling Improves Generated Images
AI image upscaling uses trained models to increase the resolution of an image while adding detail that wasn't present in the original. Unlike traditional interpolation (which simply stretches pixels and results in a blurry, larger image), AI upscalers analyze the image content and generate new detail that's contextually appropriate: sharper edges, clearer textures, more defined facial features.
For AI-generated images specifically, upscaling is the bridge between a good concept and a usable asset. The image that came out of the image generator might be perfect creatively, but the base resolution often isn't sufficient for print, high-resolution display ads, or detailed product presentations.
Why AI-Generated Images Need Upscaling
Most AI image models generate at resolutions optimized for speed and quality balance, not for maximum pixel count. The output is designed to look good at standard web sizes, but when you need to crop, zoom, or display at larger formats, the limitations show. Fine text becomes unreadable, skin textures lose nuance, and product details blur.
Upscaling addresses this without requiring you to regenerate at a higher resolution (which often changes the composition in ways you didn't intend). You keep the exact image you approved and simply enhance its detail and resolution.
.png)
The Two Upscale Options in LTX Studio
Z-Image Upscale: Fast and Affordable
Z-Image Upscale is the faster, more cost-effective option. It improves image quality by up to 2x resolution while keeping generation times short and credit costs low.
How Z-Image Upscale works: Z-Image processes the upscale through a streamlined AI pipeline optimized for throughput. It's designed for workflows where you're upscaling multiple images quickly and need consistent quality across a batch without the overhead of a premium pipeline.
Best use cases for Z-Image:
• Social media content production where volume matters more than pixel-level precision
• Concepting and internal review rounds where images need to look good but don't need to be print-ready
• Rapid iteration when you're testing multiple creative directions and upscaling each to compare
• Budget-conscious projects where credit efficiency is a priority
Topaz Upscale: Higher Quality and More Precise
Topaz Upscale is the higher-quality option. It also improves resolution by up to 2x, but with more precise detail recovery and fewer artifacts in complex areas like faces, text, and fine textures.
How Topaz Upscale works: Topaz uses a more compute-intensive upscaling pipeline that invests additional processing time into recovering detail. The result is noticeably sharper at the pixel level, particularly in areas where the original generation was soft or lacked definition.
Best use cases for Topaz:
• Final client deliverables where quality is non-negotiable
• Print-resolution assets where viewers will see the image at large scale
• Portfolio and showcase work where detail quality reflects on your brand
• Hero images for campaigns, landing pages, or high-visibility placements
Topaz vs Z-Image For Upscaling
Quality Comparison
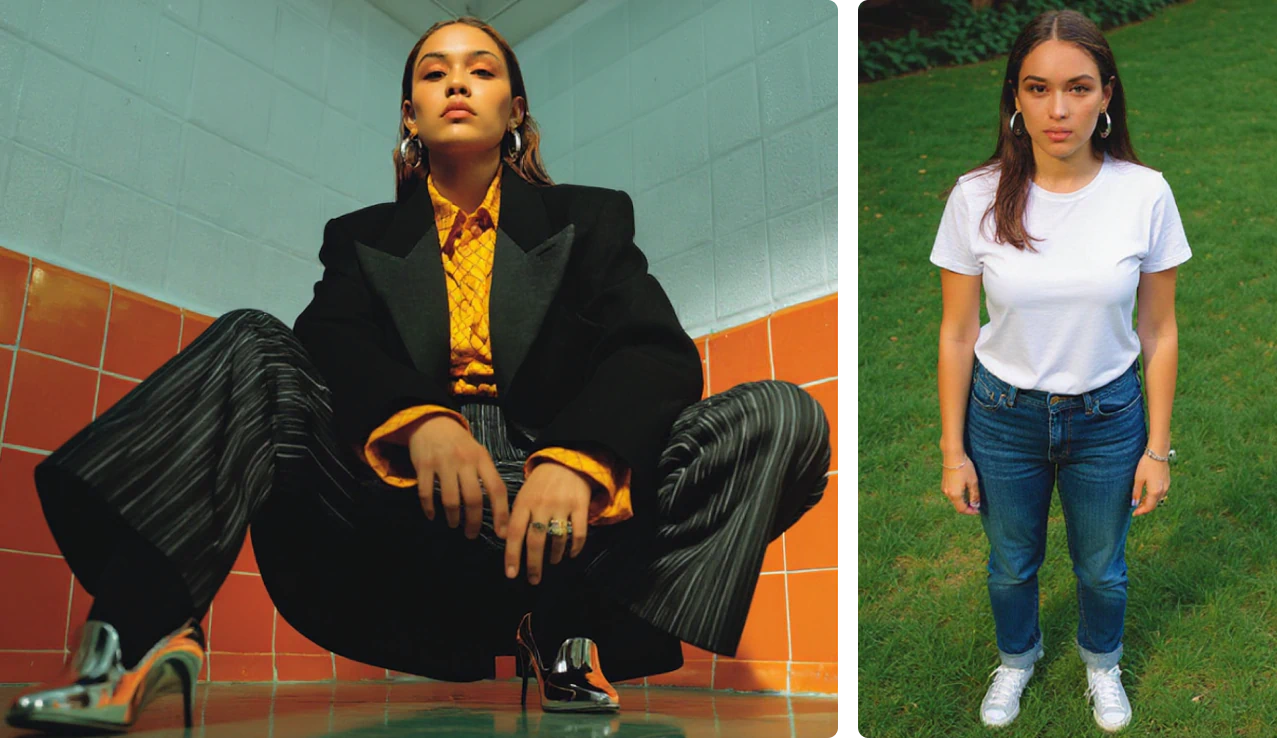
Both options improve resolution by up to 2x, but the quality of the upscaled detail differs. Topaz produces sharper, more precise results, particularly in challenging areas: faces, fine text, hair, fabric textures, and product details. Z-Image delivers solid results across the board but with slightly less precision in these high-detail areas.
For most social media and web content, the difference is marginal when viewed at typical display sizes. The gap becomes more apparent at print resolution or when viewers are able to zoom in on the full-resolution file.
Speed Comparison
Z-Image is the faster option. Its streamlined pipeline means shorter processing times per image, which adds up significantly when you're upscaling a batch of 10, 20, or 50 images as part of a content production run. Topaz takes longer per image because of the additional processing it applies to recover detail.
For time-sensitive workflows with tight deadlines, Z-Image's speed advantage matters. For single hero images where you can afford to wait, Topaz's slower pace is a non-issue.
Cost Comparison
Z-Image is the more affordable option in terms of credit cost per upscale. If you're managing a credit budget across a large project, Z-Image lets you upscale more images for the same credit spend. Topaz costs more per upscale but delivers higher precision, making it a better credit investment for images that need to look their absolute best.
.png)
Quick Decision Table
Use this as a starting point when deciding which upscale to use:
• Need it fast and affordable? Z-Image
• Need the highest possible detail? Topaz
• Upscaling a large batch? Z-Image
• Upscaling a single hero image? Topaz
• Social media or web display? Z-Image
• Print or high-resolution display? Topaz
• Internal review or concepting? Z-Image
• Final client delivery? Topaz
How to Upscale an Image in LTX Studio (Step-by-Step)
Step 1: Generate or Select Your Image
Start by generating an image in LTX Studio's image generator, or select an existing image from your project. The upscale options work on any image in your workspace, whether it was generated from a text prompt, uploaded from your computer, or produced through an image-to-video workflow.
Step 2: Open Tools and Click Upscale
Click on the generated image to open it, then navigate to Tools and select the Upscale option. This opens the upscale interface where you'll choose between the two methods.
Step 3: Choose Topaz or Z-Image
Select either Topaz Upscale or Z-Image Upscale based on your needs. There's no additional configuration required for either option. Both upscale by up to 2x resolution automatically.
Step 4: Review the Upscaled Result
Once the upscale completes, review the result at full resolution. Zoom in on detail areas: faces, text, textures, edges. If the result meets your quality requirements, you're done. If you want to compare, you can always upscale the same source image with the other method and evaluate both side by side.
When to Use Each Upscale Option
Use Z-Image for High-Volume Content Production
If your workflow involves generating and upscaling dozens of images per project (social media campaigns, ad creative testing, product catalog generation), Z-Image is the practical choice. The speed and cost advantages compound across large batches. You'll move through your production queue faster without blowing through your credit allocation.
Use Topaz for Final Deliverables and Client Work
When the image is going to a client, into a print campaign, or onto a billboard, Topaz is the right tool. The additional precision in detail recovery justifies the higher cost and processing time. These are the images where quality directly impacts how your work is perceived.
Combining Both in a Production Workflow
The most efficient approach for many teams is to use both. During the concepting and iteration phase, upscale with Z-Image. The speed lets you evaluate multiple creative directions quickly without waiting for premium processing on every variation. Once you've selected your final images, re-upscale the chosen ones with Topaz for the highest quality output.
This two-pass approach gives you speed when you need to explore and quality when you need to deliver. It's the same logic as working in proxy resolution in traditional video editing: you move fast at lower quality during the creative phase, then process at full quality for the final output.
Upscale Smarter, Not Just Bigger
AI image upscaling isn't a single-solution problem. The right upscale depends on the context: what the image is for, who's going to see it, and how much time and budget you have. LTX Studio's dual-upscale approach gives you the flexibility to match your tool to the task.
Z-Image for speed and volume. Topaz for precision and polish. Both available in the same workspace, on the same images, without switching tools or exporting to external software.
Ready to see the difference? Open LTX Studio, generate an image, and try both upscale options on the same result. Compare them side by side and decide which fits your workflow.


Maximize your creative potential with AI-powered tools
Maximize your creative potential with AI-powered tools


.png)